Thursday, January 29, 2009

January Daring Baker's Challenge

Due to extenuating circumstances [read: 300 pineapple tarts for Chinese New Year], I am completely and absolutely baked-out. So, its a blessing that this monthy's challenge is easily the simplest challenge yet in my 11 month stint as a Daring Baker. Even so, I almost didn't make it, despite simplifying the challenge down an almost embarrassing amount.

So, this month's challenge is to make Tuiles. Since I've made the traditional sweet ones before, I decided to go for a savory one, which is actually a molded parmesan crisp.

I know I'm suppose to give the recipe I used, but frankly speaking there is no recipe. Parmesan crisp is basically a small amount of grated parmesan spread to desired size on a baking sheet, baked til crisp. To make the bowl shapes, I lifted the baked crisps into muffin tins and pressed down, then allow them to cool.

As for the filling, the challenge is to fill it with something fruity. I was going to make a fruit salad, but pineapple tarts intervined, and I filled it with dragon fruit instead, because I thought it was a really special fruit and would be nice to write a little about.


A dragon fruit is actually the fruit of a cactus plant, and as far as I know, tropical and comes mostly from Thailand. Its called a dragon fruit because of its scale-like leaves. It comes in two variety, the white kind like the one I have, and a deep fuschia one, almost exactly like the colour of tge skin, except a couple shade darker. The fruit itself is extremely succulent and juicy, and had a mild taste and frangance.


Getting to the fruit is a little tricky. Dragon fruits should be treated like mangoes, except they don't have the pesky seed in the middle. The skin have to be peeled off the meat, just like how mango skin is peeled off the fruit.

Last and most important thing about this challenge: DO NOT use pre-grated parmesan to make crisps. Perhaps because they are grated too finely, so that they are more like parmesan powder than grated parmesan, the pre-packaged ones are so dry they can't melt, and thus can't cohere, and finally can't crisp but burn instead. Thank goodness I had some left-over grated parmesan in my fridge.


This month's challenge is brought to us by Karen of Bake My Day and Zorra of 1x umruehren bitte aka Kochtopf. They have chosen Tuiles from The Chocolate Book by Angélique Schmeink and Nougatine and Chocolate Tuiles from Michel Roux.

Thursday, January 22, 2009

Vietnam and Cambodia 2007, part 1


Vietnam, Cambodia, and this trip, holds some really special significance and memories for me. It was my first backpacking trip, the one that opened my eyes to the wonderful world out there waiting to be discovered. Also, on this trip, I discovered just how beautiful Southeast Asia really is. I had a really hard time choosing the photographs, because Vietnam and Cambodia is just overflowing with beauty, and it saddens me that I can't represent them all here, but I'll do my best. Last, but most certainly not least, I had the most fabulous travel mates, Shieh Yuan and Krystal, who truly truly made the trip.

The scene above is a typical rice field in Vietnam, and its peaceful sights like these that I love the most.

We started off the trip in Hanoi, a busy, vibrant city that practically throbs with life. The infamous Vietnamese traffic that gave me quite a turn on my first night, but I soon got used to it.

Dinner on our first night in Vietnam, Hanoi, a fine introduction to the fantastic street food culture of Hanoi. It was a kind of extremely thin pancake made from a rice batter wrapped around a meat and vegetable filling, served with a mountain of fried shallots, a hunk of fish cake and a huge handful of mint.

Next morning's breakfast, the world famous Vietnamese Pho, rice noodles in beef broth with beef slices, bought from a tiny eatery in the market


And then its off on our first destination, Halong Bay! I hightly highly recommend it to anyone heading to Hanoi


A one day package, which costs around 20 USD will get you on a junk like this for around 6 hours. Overnight packages are available too

This is Christie, a girl who was on the package tour to Halong Bay as well. She's from Hong Kong, and really nice =)

So, after around an hour of leisurely driving around the bay, enjoying scenery such as these,

the operators drove us to a sort of floating village, with a floating 'market' of fresh seafood they keep right there. We had to option of buying some to add to our lunch.


Then it was time for lunch, and boy, it was a glorious affair. Besides the pure enjoyment of eating on a boat, with the wind blowing through your hair, the food was top rate, cooked by the staff right there on the boat. It was so good, we only remembered to take a picture after we polished off everything.

After lunch, we drove around some more to a cave like structure, that little hole behind the 3 of us. For an additional few dollars, we had the option of getting into a smaller boat and exploring the inside. It was totally worth the money, a veritable secluded secret hide-out, like nothing we've ever seen before. Besides, this can only be done during the dry season, as the opening becomes submerged during high tides, so its definitely not to be missed!

All in all, it was a GREAT first day =)


And the next day, we visited the fantastic Ho Chi Minh Mausoleum! The communists have a really curious inclination to embalm their dead leaders' bodies and then putting them on display for the eternal adoration of their followers.
This had been done with Lenin, Mao Zedong, and Ho Chi Minh, in Vietnam. As a history student, this is a must see, and I have to say it was awesome. A little creepy, but awesome nontheless. No pictures were allowed, security was strict, procedures confusing and many, but still worth the while. Just be sure to get there early, its only opened for a very short time per day.

Vietnamese coffee, scrumptious beyond your wildest imagination if you've never had it before. Its civet cat coffee, which goes for pots of cash in Europe, but comes at a ridiculous bargain in Vietnam. Words of advice: buy as much as you can carry if you are in Vietnam! Go to the market, pick out the best grade beans, get them to grind [or not] and seal for you, that way you get even better value.

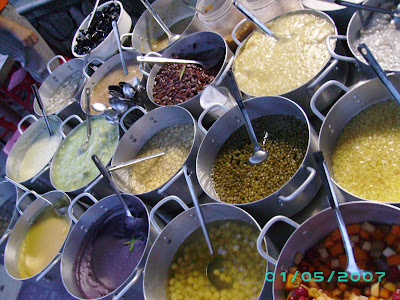
At night, we took a walk around the city, and came across this, a street-side stall selling a rainbow of traditional desserts.


The desserts are scooped out and served over ice and sugar syrup, with a dash of coconut cream over the top. Delish. I know guidebooks usually advice people to stay away from street food and ice, especially, but seriously, get a typhoid shot, bring lots of charcoal pills, and eat to your hearts content. THIS is the way to see Vietnam, not through some squeaky clean restaurant that could've been from any other city in the world.

Saturday, January 17, 2009

Pineapple tarts


I LOVE Chinese New Year, and Pineapple tarts are practically synonymous with CNY for me. In fact, that seems to be the case for a lot of people, which is why Chinese all over Southeast Asia are probably even now, as I am typing, busy creating trays of this deliciously fragrant and addictive cookie


Pineapple tarts are a curious creation, quintessentially Southeast Asian. It is a Nyonya invention, claiming both Chinese, Malay and Southeast Asian heritage, yet meaning different things to different people.

The Chinese embrace this cookie not just because its absolutely irresistable, but because we believe Pineapples to be a symbol of wealth and fortune, and thus auspicious to have in the household during the CNY.


To be honest, while I can't stop eating these cookies, I absolutely dread making them. Its a gigantic operation, it takes hours and days, its finicky and troublesome, and brain-numbingly repetitive.

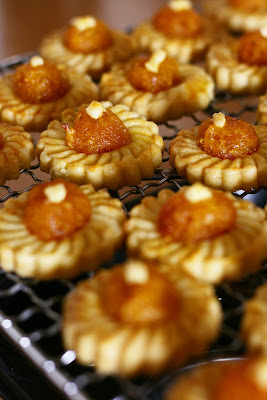
But, the result is ALWAYS spectacular. Its just impossible to buy pineapple tarts even close to the home-made taste without paying an arm and a leg for it. And then, at the price you are paying, you might as well make it yourself.
So, even though I know we all have to restraint ourselves around the tarts, or there wouldn't be any left for CNY, always take one for yourself =)


Pineapple tart pastry
Ingredients:
500g plain flour
300g unsalted butter, very cold and cut into small-ish chunks
1 tsp salt
1/2 tsp baking powder
3 egg yolks, lightly beaten
couple tbspn ice cold water
  1. Combine flour, salt and baking powder, mix well
  2. Rub butter into flour mixture
  3. Using a butter knife, mix in the egg yolks with a cutting motion
  4. Add the ice water 1 tbspn by 1 tbspn, cutting with the butter knife and checking its consistency after each addition. This is probably the most tricky part to making the pastry. Add too little and your pastry will fall apart, too much and it will be mushy. To test readiness, pinch a small amount together. If it founds a soft dough, its ready.
  5. Gather the dough together into a disc, refrigerate for 20 minutes before use. When making the tarts, use the dough portion by portion, keeping the rest in the fridge. The dough becomes hard to handle once it is warm.
Pineapple Jam
* PLEASE don't use the ready made ones. I am not being snobbish here, I have nothing against pre-made stuff if it makes life easier, EXCEPT when they taste like crap. If you are going to use pre-made, just buy the tarts and save yourself some trouble.

Ingredients:

5 smallish pineapples
1 stick of cinnamon
2 star anise
1 cup of sugar [You can add up to 2 cups. My parents prefer the cookies to be less sweet, so I only added 1]
  1. There are many ways to prepare the pineapple, depending on what kind of consistency you like your jam, and how much time you are willing to spend. My mom likes the jam with long strand of fibers, so she grates the pineapple. I think that's way too troublesome, and I don't particularly like fibers, so I either chop [more time consuming but gives more bite] or blend the pineapples. So, whichever way you chose, first step is to massacre the pineapples.
  2. Drain the pineapples if you want the juice or if you want to reduce the cooking time. I like to leave the juice, because they add flavor
  3. Pour pineapple into large pot, add the rest of the ingredients, switch on some music and stir for around 2 hours, until the mixture caramelize, dry up and looks like jam. Remove the spices.
  4. Let cool and its ready for use. You can make this way in advance and freeze it. It should keep interminably.

Assembly

  1. With the basic pastry and jam, you can assemble this in any number of ways. My family likes the open face tarts, so that's what we have here.
  2. Using special pineapple tart molds, cut out the tarts.
  3. Roll a small amount of the jam into a ball and place into the indentation
  4. Cut out a tiny decorative piece of dough to place on top of the jam. I don't really know why we do this, just that my mom taught me to do it this way and now tarts without that little dot on top doesn't look like pineapple tarts.
  5. GENEROUSLY go over with egg wash. Just remember: wherever you want the tart to appear golden, egg wash it.
  6. Bake at 180 degree celcius until golden
  7. This recipe makes around 100 tarts, which sounds like a lot, but they will actually disappear with alarming speed under the combined assault of relatives.

Wednesday, January 14, 2009

The Reason

I think I now know why the higer powers directed me towards baking. It is because nothing, and I mean NOTHING, is more therapeutic and calming for me than a giant slice of sugary, buttery, crumbly, fluffy and hopefully, if there's a god, chocolaty piece of cake.

Tuesday, January 13, 2009

Popcorn

This sums up a great chunk of my December holidays. My holiday consisted almost primarily of too much popcorn [mostly savory, I always burn my caramel], too much movies, too much TV, too much trashy novels, and wayyy too much slacking around. All because I found THE way to make perfect popcorn.

Ingredients:

1/3 cup popcorn kernels

2 tablespoon oil

salt/butter/caramel/whatever you want on your popcorn

*serves 2

Heat oil for around 5 minutes, then throw in one kernel.

When kernel pops, remove pan from heat and pour in the rest of the kernels. Shake well to coat kernels with oil. Count to 30.

Place back onto the stove, and shake pan when kernels start to pop. To ensure crunchy popcorns, open lid a little to let steam out as the kernels pop.

Season as desired, slot in a movie and enjoy!

P.S. I found this on someone's blog, but I can't remember whose, I'm really sorry I can't credit you!

Sunday, January 11, 2009

Chocolate Cake

My latest baking mission: to find a recipe for a fluffy chocolate cake, as well as a frosting that taste good and pipe well.

It doesn't sound that hard, a good chocolate cake and frosting recipe. Most bakers will probably have a favorite stashed away, and I know this because I've been asking around.

Unfortunately, none of them seemed to work. After a whole series of failed chocolate cakes [read: dense and flat and unappetizing], the mere mention of chocolate cake makes me queasy

But, I am determined to get this done. So today, I set out to bake a chocolate cake incorporated with the entire arsenal of rising agents I have at my command. Meaning, inside this cake, I used baking soda, baking powder, as well as separately beaten egg whites, all in an attempt to create THE fluffy chocolate cake

The result? Not bad, considering. It still wasn't as tall as I had hoped, but I'm beginning to suspect that this legendary tall and fluffy cake I'm chasing after doesn't exist, and I should just be content with this fluffy-but-not-so-tall cake.

As for the frosting, what I have here is a coffee Swiss meringue buttercream. While delicious, it is nowhere near stiff enough to hold delicate pipings like flowers and leaves. Seems to me only shortening can achieve the consistency that I want, but due to my [irrational?] disgust for shortening, I'm forever stuck with unattractive crude looking cakes. So if anyone has a good recipe for a frosting stiff enough to pipe without using shortening, give it to me and you'll have my eternal gratitude